How To Add A Sale To Pricing Tables
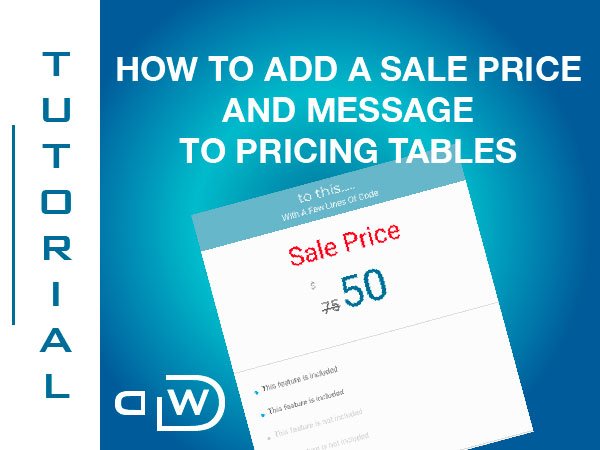
We will go from this.......
Divi Out Of The Box
$50
- This feature is included
- This feature is included
- This feature is included
- This feature is not included
- This feature is not included
to this.....
With A Few Lines Of Code
$50
- Sale Price
- This feature is included
- This feature is included
- This feature is not included
- This feature is not included
Firstly add your pricing table
- Add a pricing table
- Add a sales message to the top of the features list. Here I’ve added Sale Price
Table Title
Subtitle goes Here
$50
- Sale Price
- This feature is included
- This feature is included
- This feature is included
- This feature is not included

Custom Class
The next thing we need to do is add a custom class to the sales pricing table. Here I have added a class called my_sale_pricing
Sales Message
With this method we are targeting the first list item (Sales Price) and moving it above the actual price with the use of jQuery. If you don’t know where to put the code check out this tutorial.
jQuery( document ).ready(function($) {
 $(".my_sale_pricing .et_pb_pricing_content_top").each(function() {
    $(this)
      .parent()
      .find(".et_pb_pricing_content .et_pb_pricing li")
      .first()
      .prependTo(this);
  });
});
.my_sale_pricing .et_pb_pricing_content_top li {
  font-size: 48px;
  padding-bottom: 10px;
  color: red;
}
.my_sale_pricing .et_pb_pricing_content_top li span::before {
  display: none;
}
Previous Price
Simply change the content: “75”; from 75 to whatever number you need.
.my_sale_pricing .et_pb_sum::before {
  content: "";
  margin-right: 5px;
  font-size: 30px;
  color: #666;
  text-decoration: line-through;
}

.my_sale_pricing .et_pb_sum::before {
  content: "75";
}
That’s all folks. Job done!
Leave a comment and let me know what you think.